Hi again Petals Padawan. Glad to see you're still on board !
For your 3rd day, you will connect Petals to an FTP server, and expose the created FTP service as a SOAP web-service, outside Petals ESB.
- Petals Guide Package 1.0 - Download binaries here
- Tomcat 6.0.29
- JDK 6 update 20
- soapUI 3.6
This Tutorial uses:
- Petals Studio
- Petals ESB
- Petals SE RMI
- Petals BC SOAP
- Petals Web console
- Tomcat
- Petals BC FTP (new)
- soapUI (new)
Deploy a FTP Service Unit
Install and Deploy BC-FTP:
- Download Petals-BC-FTP .
- Deploy BC-FTP in Petals ESB.
Configure and deploy a FTP Service-Unit for [ftp.petalslink.com]:
- Start Petals ESB.
- Launch Petals Studio.
- Go to File > New > Service Unit Project.
- Select Provide > FTP > Your_Current_Version
- Click Next. It displays the window "FTP Service-Unit - Defines the JBI properties of the service to import."
- Service Name: FtpTutorial
- Click Next > Next: It displays the window "FTP Service-Unit - Define the specific properties for this version of the component."

<folder> attribute is written as optionnal in Studio, but it is not. It will be optional in BC-FTP v3, so as soon as it is published, you will not need to specify the folder attribute for the tutorial. - Server: ftp.petalslink.com
- Port: 21
- User: petals
- Password: demo
- Folder: /
- Transfer Type: auto
- Connection Mode: active
- Click Finish.
- Look the generated jbi.xml component configuration. It should look like:
jbi.xml
<jbi:provides
interface-name="generatedNs:FtpInterface"
service-name="generatedNs:FtpTutorial"
endpoint-name="FtpTutorialEndpoint">

<\!-\- CDK specific elements -->
<petalsCDK:timeout>30000</petalsCDK:timeout>
<petalsCDK:validate-wsdl>true</petalsCDK:validate-wsdl>
<petalsCDK:forward-security-subject>false</petalsCDK:forward-security-subject>
<petalsCDK:forward-message-properties>false</petalsCDK:forward-message-properties>
<petalsCDK:forward-attachments>false</petalsCDK:forward-attachments>
<petalsCDK:wsdl>FtpService.wsdl</petalsCDK:wsdl>

<\!-\- Component specific elements -->
<ftp:server>ftp.petalslink.com</ftp:server>
<ftp:port>21</ftp:port>
<ftp:user>petals</ftp:user>
<ftp:password>demo</ftp:password>
<ftp:folder>/</ftp:folder>
<ftp:transfer-type>auto</ftp:transfer-type>
<ftp:connection-mode>active</ftp:connection-mode>
</jbi:provides>
- Look the generated FtpService.wsdl sources. Operations available on service are described here.
- Go in Service-Unit Project on the left Petals projects tree.
- Right click on "su-FtpTutorial-provide".
- Select Petals > Fast Export for Petals.
Known bug for Studio v1.1.0 !
Please check jbi.xml and FtpService. There is a bug sometimes (on Windows 7).
"interface-name" attribute in jbi.xml and "portType name" in the WSDL should have the same value. If not, please correct FtpService.wsdl :- SELECT:
<wsdl:portType name="Ftp"> - REPLACE BY:
<wsdl:portType name="FtpInterface">
This is a known bug in Petals Studio 1.1.0. It might be corrected in version 1.1.1.
- SELECT:
- Drop the generated sa-FTP-FtpTutorial-provide.zip to ./petals-platform-xxx/install/ folder to deploy it.
- Check Petals ESB traces to be sure the SA was deployed successfully.
Test and monitor in Webconsole
Send test DIR Operation on root folder:
- Start the Webconsole
- Go to Webconsole > Server:0 > Test > Send
- Select:
- Endpoint: FtpTutorialEndpoint
- Operation: dir
- MEP: InOut
- Click Submit.
You should get a response message, listing files on the Ftp.
Monitor services:
- Go to Webconsole > Server: 0 > Monitoring > Server Monitoring.
- Check Filter endpoint.
- Select Endpoint "FtpTutorialEndpoint"

You can also create filters based on Interface name, Service Name or Operation Name. This is useful for example if one service is duplicated on multiple endpoints. - Click Submit. "FtpTutorial" is now visible in exchange filters list.
- Click the small icon in "Monitoring" column in the list, to activate monitoring for "FtpTutorialEndpoint".
- Send a few test messages from the test panel.
- Go to: Monitoring > Filter Monitoring.

Screenshot: Message exchange monitoring

Change destination folder:
- Got to ftp://ftp.petalslink.com in your web browser or ftp client, using previous login. You see there is an "Integration" folder. Let's go there.
- Go to Petals Studio.
- Edit FtpTutorial's jbi.xml.
- Replace "<folder>/</folder>" by "<folder>Integration</folder>"
- Save
Redeploy the component:
- Go to Webconsole > Server: 0 > Administration > Service-Assemblies.
- Uninstall the previous FtpTutorial SA: Click Stop then Shutdown then Uninstall).
As for installing, you can use three methods: - from Webconsole: Click alternatively Stop, Shutdown and Uninstall (Alternatives: "force undeploy" or "clear all")
- from Autoloader: Remove the corresponding .ZIP package from ./petals-platform-xxx/installed/
- from Command Line: Type hu or hotundeploy. Ex: "hu sa-FTP-FtpTutorial-provide.zip".
- Go to: Petals Studio.
- Fast-export the FTP Service-Unit.
- Drag&Drop the newly generated sa-FTP-FtpTutorial-provide.zip from Eclipse to ./petals-platform-xxx/install/
- Check in Petals ESB traces that the new SA was deployed sucessfully.
- Test FTP Service-Unit by calling DIR operation on Webconsole.
Want to go further?
Try reading the files you listed. Look at the BC-FTP Documentation and go on your own. (note that your ftp session is read-only, if you want to call writing operations, create your own ftp server).
Expose the FTP service over SOAP
Before, SOAP was used to import WSDL to create services inside Petals ESB. Meaning Provide a SOAP service inside the bus.
This time you will do the contrary : A service (FTP) exists inside the bus. You will create a SOAP Service-Unit to Consume the existing "FtpTutorial" Service. This will expose "FtpTutorial", and make it accessible over SOAP protocol.
Expose a SOAP-Consume of FtpTutorial:
- Go to Petals Studio.
- Click File > New > Service-Unit Project.
- Select Consume > SOAP > Your_BC-SOAP_Version.
- Click Next. It displays the window "SOAP Service-Unit - You have to provide the namespace".
- Click Select a service.
- Select FtpTutorial implements FtpInterface @ FtpTutorialEndpoint.
- Click OK. Fields are automatically completed.
- Click Next > Next. It displays the window "Define the specific properties for this version of the component".
- Service Name: SoapFtpTutorial
- Click Next > Finish.
- Export and deploy in Petals ESB.
Test with SOAP UI
Install SOAP UI:
Download SOAPUI and install it. SOAP UI is a client to send and receive messages with SOAP protocol.
Find the WSDL URL:
- You just deployed sa-SOAP-FtpTutorial-consume. Look at Petals ESB traces. Among the last messages, find one similar to the one following. And find the root URL, here "http://127.0.0.1:8084".
[Petals.Container.Components.petals-bc-soap]-INFO 2010-10-06 15:26:22,032 The Axis2 service 'SoapFtpTutorial' has been registered and is available at 'http://127.0.0.1:8084/petals/services/SoapFtpTutorial' - Go to http://127.0.0.1:8084 in your web browser.
- Go to Service List.
- Copy the SoapFtpTutorial WSDL URL.
Create a SOAP UI Project:
- Launch SOAP UI.
- Click File > New soapUI Project.
- Project Name: PetalsFtpTutorial (or whatever name).
- Initial WSDL/WADL: Paste the WSDL URL previously copied. Might be: http://127.0.0.1:8084/petals/services/SoapFtpTutorial?wsdl
- Click OK.
Test the proxified FTP DIR operation:
- Click PetalsFtpTutorial > FtpServiceSoapBinding > dir.
- Right click on Request1.
- Select Show Request Editor: It displays a window with a pre-generated message.
- Delete what is under <!-
Optionnal->. This means deleting <connection> node and its children.
| Ftp parameters are already configured in the Service-Unit, so you do not need to configure them again. |
<soapenv:Envelope xmlns:soapenv="http://schemas.xmlsoap.org/soap/envelope/" xmlns:ver="http://petals.ow2.org/components/ftp/version-3">
   <soapenv:Header/>
   <soapenv:Body>
      <ver:dir>
      </ver:dir>
   </soapenv:Body>
</soapenv:Envelope>
- Clic the green arrow to send the message. The response should list several files.
Want to go further?
Try reading "HelloWorld.txt" into "Integration" folder, using optional elements instead of deleting them.
You need to redefine ALL properties in this case.
Technical monitoring with Webconsole:
- Go to Webconsole > Server: 0 > Monitoring > Server Monitoring
- Check Filter Endpoint.
- Select FtpTutorialEndpoint.
- Click Submit.
- Click the small image in the "Monitoring" column to activate FtpTutorialEndpoint monitoring.
- Send a few test message with SOAP UI.
- Go to Webconsole > Server: 0 > Monitoring > Filter Monitoring.
- Click on the magnifier image on the right of any message exchange to get details. You should get a screen like this:
Screen: Message exchange status
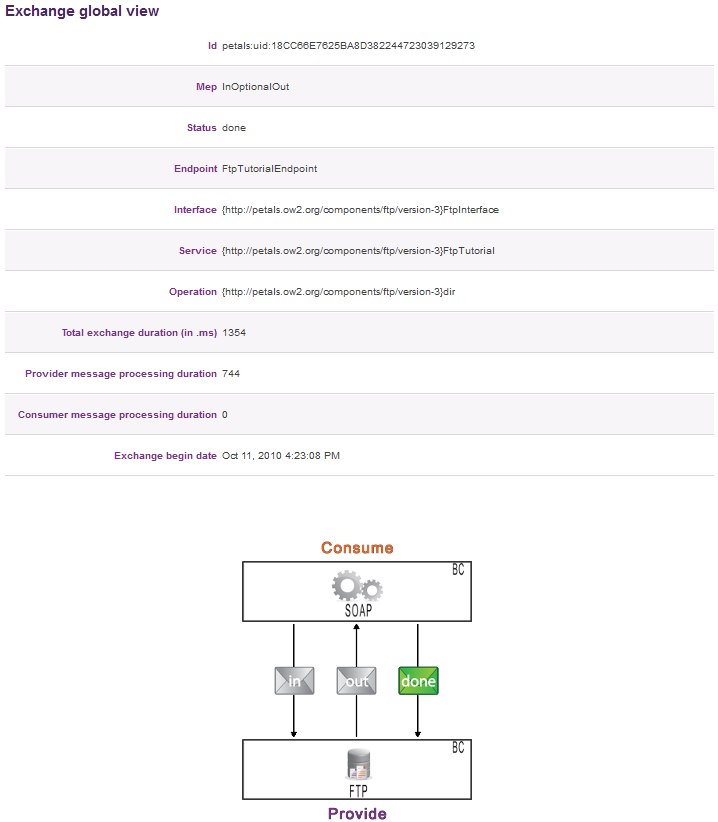
| You can see the message was sent by BC-SOAP to BC-FTP |
DONE. Bravo!
Now you know how to:
- Connect Petals ESB to an FTP Server and call operations.
- Monitor service exchanges in Webconsole.
- Expose a Petals Service as external SOAP Web-service.
- Test a web-service with soapUI.
This was more "real" usecase, hum ? Difficulty goes increasing, your knowledge as well.
Tomorrow you will create a Petals service based on a custom Java class (annotated JSR 181)