Introduction
Overview
Petals View is a webapplication dedicated to Petals ESB flows monitoring.
Installation in a nutshell:
- download these JBI components: petals-se-notification-X.zip and petals-se-kpi-X.zip;
- download the petals view's war (petals-view-ui-X.war);
- create all the service assemblies for the KPI. You need to get the infos you want (with prior installation and configuration of related components and services assemblies).
How does it work?
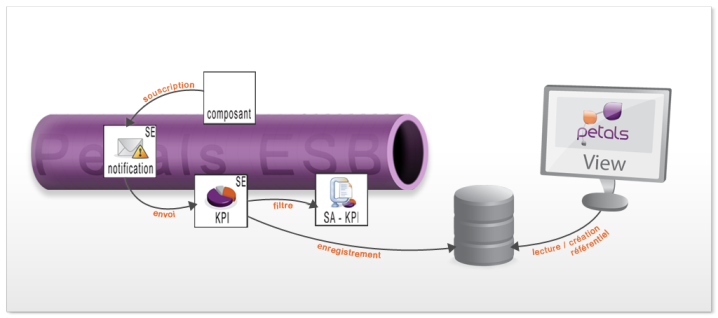
- You configure a component so that when it is installed, it will register in petals-se-notification base: "I can send notifications to you".
- Upon reception, petals-se-notification forwards these notifications to petals-se-kpi (configured with its own services assemblies – sa-kpi).
- What is a sa-kpi? It's a set of filters that will select specific information among the whole flow data. Whenever an exchange fits with a sa-kpi, a notification (with selected data only) is send from the component and will be saved in a relational database. This database has to be shared between KPI Service Engine and Petals View.
- Petals View then connects to this database to retrieve informations.
- Messages are saved into the database in a "raw" format. Petals View will give them meaning by naming and organizing them in a human-readable way.
This diagram presents monitoring-related relationships between Petals ESB, various components, SE-notification, SE-KPI, configured sa-kpi and Petals View.
This documentation details Petals View installation in 5 steps:
- First one is to set up the persistent environment, and configuration file for database access.
- Second one is to add to some configurations to make the persistent environment common between Petals View and SE-kpi component.
- Third one is to set up the notification environment, in other words configure the components so that they register in petals-se-notification.
- Fourth one is, through practical examples, to create the sa-kpi which will filter notification (select only the ones we really want to know about).
- Fifth one is to configure the referential in Petals View, to give meaning to the raw data stored in the database.
First stage: setting up persistent environment
| The default configuration uses an H2 database that we don't recommend to use in a production environment. |
If you don't have any MySQL (or PostgreSQL) database server up and ready yet, download and install it following your system's procedure.
- Create a database for Petals View:
example: petalview
- Create a user with all rights granted to this database
example: user: view
pwd: view
- Create the database access configuration file. The name of this file is mandatory:
petals-view.properties
This file will hold the following informations - see the screen hereunder (informations in blue are values you have to change to conform with your database's name and user).
All database tables will be automatically created at Petals View's first launch.
\###########
### Petals View properties file
\############
\##Globals Informations
jdbc.hibernate.hbm2ddl.auto = update
jdbc.hibernate.show_sql = false
jdbc.initialSize = 0
jdbc.maxActive = 8
jdbc.maxIdle = 8
jdbc.minIdle = 0
jdbc.maxWait = \-1

## MySQL Datasource
jdbc.driverClassName = com.mysql.jdbc.Driver
jdbc.url = jdbc:mysql://localhost:3306/petalsview
jdbc.username = view
jdbc.password = view
jdbc.hibernate.dialect = com.ebmwebsourcing.petalsview.persistence.util.MySqlInnoDBDialect

## PostGreSQL Datasource
\#jdbc.driverClassName = org.postgresql.Driver
\#jdbc.url = jdbc:postgresql://localhost:5432/petalsview
\#jdbc.username = view
\#jdbc.password = view
\#jdbc.hibernate.dialect = org.hibernate.dialect.PostgreSQLDialect
Stage 2: Configuring Petals View
- Download the KPI component (petals-se-kip.zip)
- Browse to petals-se-kip.zip/META-INF
- Open the jbi.xml file.
- On the line <petals-se-kpi:hibernateURL>: fill in the path of the file petals-view.properties (that you created in Stage 1).
example:
<petals-se-kpi:hibernateURL xmlns:xsi="http://www.w3.org/2001/XMLSchema-instance"
xmlns:jbi="http://java.sun.com/xml/ns/jbi" xmlns:petals-se-kpi="http://petals.ow2.org/components
/petals-se-kpi/version-1.0-SNAPSHOT" xmlns:kpi-config="http://petals.ow2.org/components/petals\-
se-kpi/specific" xmlns:petalsCDK="http://petals.ow2.org/components/extensions/version-x">[file:///home/user/Bureau/petals-view.properties]
</petals-se-kpi:hibernateURL>
If you use MySQL or Oracle database, You need to copy mysql-connector-java-5.1.x.jar or oracle-jdbc-10g.jar in your petals-se-kpi component with the others dependencies.
Save the changes.
- Download Petals View (petalsview.war)
- Browse to petalsview.war/WEB-INF/spring
- Open the file petals-view-annotation.xml
- Fill in the path to petals-view.properties file:
<bean
class="org.springframework.beans.factory.config.PropertyPlaceholderConfigurer">
<property name="location" value="file:////home/strino/Bureau/petals-view.properties"/>
</bean>
Save the changes.
If you use MySQL database or Oracle database, You need to copy mysql-connector-java-5.1.x.jar or oracle-jdbc-10g.jar in PetalsView/ WEB-INF/lib.
Stage 3: Configuring and setting up notification environment
- Setting up Petals ESB and its components:
- Download and install Petals ESB
- Install the SE-Notification component

You HAVE to install this component BEFORE ANY OTHER, otherwise there could be configuration conflict preventing notifications to work. - Install all components that you don't need to emit notifications
- Install the SE-KPI component (petals-se-kpi.zip) using the configuration created at Stage 2
- Configuring the components which will emit notifications: follow this procedure for each one of them:
- Browse to yourcomponent.zip/META-INF/
- Open the jbi.xml file
- Find the following line and set up its value to "true" and save it :
<petalsCDK:notifications xmlns:xsi="http://www.w3.org/2001/XMLSchema-instance"
xmlns:jbi="http://java.sun.com/xml/ns/jbi"
xmlns:soap="http://petals.ow2.org/components/soap/version-x"
xmlns:petalsCDK="http://petals.ow2.org/components/extensions/version-x">
true
</petalsCDK:notifications>
- Install the component in Petals ESB
- Install all Services Assemblies you want to use with these components.
Stage 4: Creating your SA-KPI.zip and corresponding SU-KPI.zip
You can use Petals Studio to create the SA-KPI needed for notification configuration. For this guide, we'll use an example of SA/SU batch to show you how to create them.
A SA-KPI is composed of: a META-INF folder which will contain jbi.xml file and the su-kpi.zip.
example of a jbi.xml file from a sa-kpi.zip :
<jbi version="1.0" xmlns="http://java.sun.com/xml/ns/jbi">
<service-assembly>
<identification>
<name>sa-in</name>
<description>SA in.</description>
</identification>
<service-unit>
<identification>
<name>su-notif-in</name>
<description>su in description.</description>
</identification>
<target>
<artifacts-zip>su-notif-in.zip</artifacts-zip>
<component-name>petals-se-kpi</component-name>
</target>
</service-unit>
</service-assembly>
</jbi>
A SU-KPI is composed of: a META-INF folder containing SU's jbi.xml file and a special file, modelNotification.xls
example of jbi.xml file of a SU:
<?xml version="1.0" encoding="UTF-8"?>
<\!--JBI descriptor for the PEtALS' "petals-se-kpi" component (WS-Notification).
Originally created for the version 1.0-SNAPSHOT of the component.  \-->

<jbi:jbi version="1.0" xmlns:notification="http://petals.ow2.org/petals-se-notification"
xmlns:wsn-br="http://docs.oasis-open.org/wsn/br-2"
xmlns:kpi="http://petals.ow2.org/petals-se-kpi"
xmlns:jbi="http://java.sun.com/xml/ns/jbi"
xmlns:petalsCDK="http://petals.ow2.org/components/extensions/version-5"
xmlns:xsi="http://www.w3.org/2001/XMLSchema-instance"
xmlns:st="http://www.ebmwebsourcing.com/wsnotification/specificTypes">

<\!-\- Import a Service into PEtALS or Expose a PEtALS Service => use a BC. \-->
<jbi:services binding-component="false">

<\!-\-  Expose a PEtALS Service => consumes a Service. \-->
<jbi:consumes
interface-name="wsn-br:NotificationBroker"
service-name="notification:NotificationBrokerService"
endpoint-name="NotificationBrokerServiceEndpoint">

<\!-\- CDK specific fields \-->
<petalsCDK:operation>Subscribe</petalsCDK:operation>
<petalsCDK:mep>InOut</petalsCDK:mep>
<\!-\- Component specific elements \-->
<\!-\- Subscription to process on init : \-->
<kpi:TopicExpressionDialect>[http://docs.oasis-open.org/wsn/t1/TopicExpression/Full]</kpi:TopicExpressionDialect>
<kpi:TopicExpressionNamespace>[http://petals.ow2.org/topic]</kpi:TopicExpressionNamespace>
<kpi:TopicExpressionPrefix>petals</kpi:TopicExpressionPrefix>
<kpi:TopicExpressionContent>petals:component/cdk/producer/in\[\]</kpi:TopicExpressionContent>

<kpi:MessageContentXpath>boolean(/\*[local-name()='publishBusinessEntity'|local-name()='publishBusinessEntity'])</kpi:MessageContentXpath>
<kpi:MessageContentXpathDialect>[http://www.w3.org/TR/1999/REC-xpath-19991116]</kpi:MessageContentXpathDialect>
<kpi:MessageContentSOADialect>[http://www.ebmwebsourcing.com/wsnotification/soaparameter]</kpi:MessageContentSOADialect>

<kpi:MessageContentSOAInterfaceNamespace>[http://org.ow2.petals/demo/travelagency/agency/]</kpi:MessageContentSOAInterfaceNamespace>
<kpi:MessageContentSOAInterfaceName>travelAgency</kpi:MessageContentSOAInterfaceName>
<kpi:MessageContentSOAServiceNamespace>[http://org.ow2.petals/demo/travelagency/agency/]</kpi:MessageContentSOAServiceNamespace>
<kpi:MessageContentSOAServiceName>travelAgencyService</kpi:MessageContentSOAServiceName>

<kpi:TransformPolicy>/modelNotification.xsl</kpi:TransformPolicy>

<kpi:ContextPolicyCorrelationId>true</kpi:ContextPolicyCorrelationId>
<kpi:ContextPolicyInterface>true</kpi:ContextPolicyInterface>
<kpi:ContextPolicyEndpoint>true</kpi:ContextPolicyEndpoint>
<kpi:ContextPolicyMeuuid>true</kpi:ContextPolicyMeuuid>
<kpi:ContextPolicyNotifDate>true</kpi:ContextPolicyNotifDate>
<kpi:ContextPolicyService>true</kpi:ContextPolicyService>
<kpi:ContextPolicyStatus>true</kpi:ContextPolicyStatus>

<kpi:ProcessPolicyAction>create</kpi:ProcessPolicyAction>
</jbi:consumes>
</jbi:services>
</jbi:jbi>
- The text in red defines for which state you configure the present SU: in – out – status --fault.
- Texts in blue define the filtering you want to apply to notifications:
<kpi:MessageContentXpath>boolean(/*[local-name()='publishBusinessEntity'])</kpi:MessageContentXpath> :- here you can apply filtering criteria on content fields, as long as they are present in the messages. If you don't want any content filtering, set the value to "true".
Example : <kpi:MessageContentXpath>boolean(true())</kpi:MessageContentXpath> - You can filter directly on service's endpoint or interface (these fields are not mandatory). You can also filter on endpoint:
<kpi:MessageContentSOAInterfaceNamespace>http://org.ow2.petals/demo/travelagency/agency/</kpi:MessageContentSOAInterfaceNamespace>
<kpi:MessageContentSOAInterfaceName>travelAgency</kpi:MessageContentSOAInterfaceName>
<kpi:MessageContentSOAServiceNamespace>http://org.ow2.petals/demo/travelagency/agency/</kpi:MessageContentSOAServiceNamespace>
<kpi:MessageContentSOAServiceName>travelAgencyService</kpi:MessageContentSOAServiceName>
<kpi:MessageContentSOAEndpoint>travelAgencyEndpoint</kpi:MessageContentSOAEndpoint>
- here you can apply filtering criteria on content fields, as long as they are present in the messages. If you don't want any content filtering, set the value to "true".
- Text in orange defines the name of the file which will be used as a model for the notifications.
example of the modelNotification.xls file:
<xsl:stylesheet version='1.0' xmlns:xsl='http://www.w3.org/1999/XSL/Transform' >
<xsl:output method="xml" indent="yes"/>
<xsl:template match="/">
<wsnebm:NotifyContent xmlns:wsnebm="http://www.ebmwebsourcing.com/WS-BaseNotification/NotifyContent"
processType="1" xmlns:age="\[http://org.ow2.petals/demo/travelagency/agency/">
<wsnebm:params>
<wsnebm:param><xsl:value-of select="//age:lastname/text()"/></wsnebm:param>
<wsnebm:param><xsl:value-of select="//email/text()"/></wsnebm:param>
</wsnebm:params>
</wsnebm:NotifyContent>
</xsl:template>
</xsl:stylesheet>
processType: here you have to type the same integer value as in Petals View's referential for this type of flows.
xmlns:age="http://org.ow2.petals/demo/travelagency/agency/": here, you define a parameter
<wsnebm:params>
<wsnebm:param><xsl:value-of select="//age:lastname/text()"/></wsnebm:param>
<wsnebm:param><xsl:value-of select="//email/text()"/></wsnebm:param>
</wsnebm:params>
Here you define the parameters you want to attach to your step. Notice that for now, the parameters attached to an «out» state will not be taken in account.
Stage 5: Configuring the Referential in Petals View
- Deploy Petals View's war in an application server
- Connect to Petals View through any web browser (http://server/PetalsView|http://server/PetalsView).
- To connect for the first time, use the default admin user (login/password: admin/admin)
For more details on configuring a referential in Petals View, check our PetalsView-UserGuide.pdf
Click on "Referential Management" in left menu panel.
If you already launch at least one flow in PetalsESB:
- Click on the "Unknown" flow type:
- its type is automatically filled in and cannot be changed
- define its human-readable name.
- Click on "CREATE"'
- You'll arrive directly on the flow type's edition page. Normally, all steps composing this flow should appear together with their service/interface name.
To configure each one and any of the unknown steps:
- Click on an "unknown" step:
- Functional (human-readable) name: give it the name of your choice
- Interface name / Service name: these are automatically filled in with the right info
- Start flow? and End flow? checkboxes are used to define whether this step is first and/or last one of the flow.
- Success message: the message which will be displayed when step is in "Success" status.
- Error message: the message which will be displayed when your step is in "Error" status.
- Click on "Submit" to save changes and come back on flow type's edition screen.
You can notice that now, the step you defined is not shown on "Unknown tables" anymore, but instead in the referential table.
Click on any defined step to access its edition screen. Under the general informations, you can see a sentence telling if you have associated parameters in your database.
Example: Number of unknown parameters: 1 (you have one associated parameter)
To configure a parameter :
- In functional fields click on "ADD" and fill in the following informations:
- Index: relates to its rank in notification, will be automatically incremented.
- Name: give it the human-readable name of your choice
- Global: if you check it, this parameter will not only be visible in step view, but also in global view of any flow of this flow type.
- Click on "Submit" to save changes and come back on step's edition screen. Notice that the number of unknown parameters have decreased by one (in our example, it's now 0).
Repeat the procedure to configure any and all steps and parameters.
If you didn't launch any flow in Petals ESB yet:
- Click on ''ADD'' button
- Give a numerical value type (this value corresponds to ProcessType you define in your model notification)
- define its human-readable name.
- Click on "CREATE" to save it and go to edition screen of the flow type's referential you just created. Here you can add steps.
- Click on "Add" to add and configure steps to your referential (fields in yellow are mandatory)
- Functional name: give it the name of your choice
example: Travel agency - Interface name: fill in the qualified name of your interface
example: {[http://org.ow2.petals/demo/travelagency/agency/]} travelAgency - Service name: fill in the qualified name of your Service
example: {[http://org.ow2.petals/demo/travelagency/agency]} travelAgencyService - Start flow? and End flow? checkboxes are used to define whether this step is first and/or last one of the flow.
- Success message: the message which will be displayed when step is in "Success" status.
- Error message: the message which will be displayed when your step is in "Error" status.
- Functional name: give it the name of your choice
- Click on "Submit" to save and go to the edition screen of the step you just created. You can then configure parameters.
- Click on "Add" to add parameters to your step.
- Index: relates to its rank in notification, will be automatically incremented.
- Name: give it the human-readable name of your choice
- Global: if checked, this parameter will be visible in step view AND in global view of any flow of this flow type.
- Click on "Submit" to save the changes.
Repeat the procedure to configure all steps and parameters you want to be shown in Petals View.
Known problems
Unable to start the application under tomcat 6
Under some Operating System (checked on Red Hat Entreprise 5), by default, the Tomcat Security Manager doesn't allow the access to classes with a restricted user. So the application doesn't start. So you must add this lines into the catalina.policy file (you can found it into the conf directory of your tomcat installation):
grant codeBase "file:${catalina.home}/webapps/petals-view-ui-X/WEB-INF/classes/-" { };
Then you restart the tomcat server, and now the application may start.
Exception opening port H2 TCP Server
If you use the SE KPI with its default configuration (using H2 database - File mode and server enabled), on RedHat like distribution (RHEL, Federo, CentOS) you can get the following error:
Could not obtain connection to query metadata org.apache.commons.dbcp.SQLNestedException: Cannot create PoolableConnectionFactory (Exception opening port H2 TCP Server (tcp://localhost:40374) (port may be in use), cause: timeout [90061-114])
This error is due to the default classic security policy of the previously listed operating systems that allow only to use port lower than 8900.
Two solutions:
- break this default security configuration: more performant, less secure
- using the H2 database file mode and server disabled: more secure, less performant. To do this replace into the configuration the line 'jdbc.url = jdbc:h2:~/test/db/petalsview;AUTO_SERVER=TRUE' by the line 'jdbc.url = jdbc:h2:file:~/test/db/petalsview'
- replace the H2 database, that is not recommended, by another database engine.