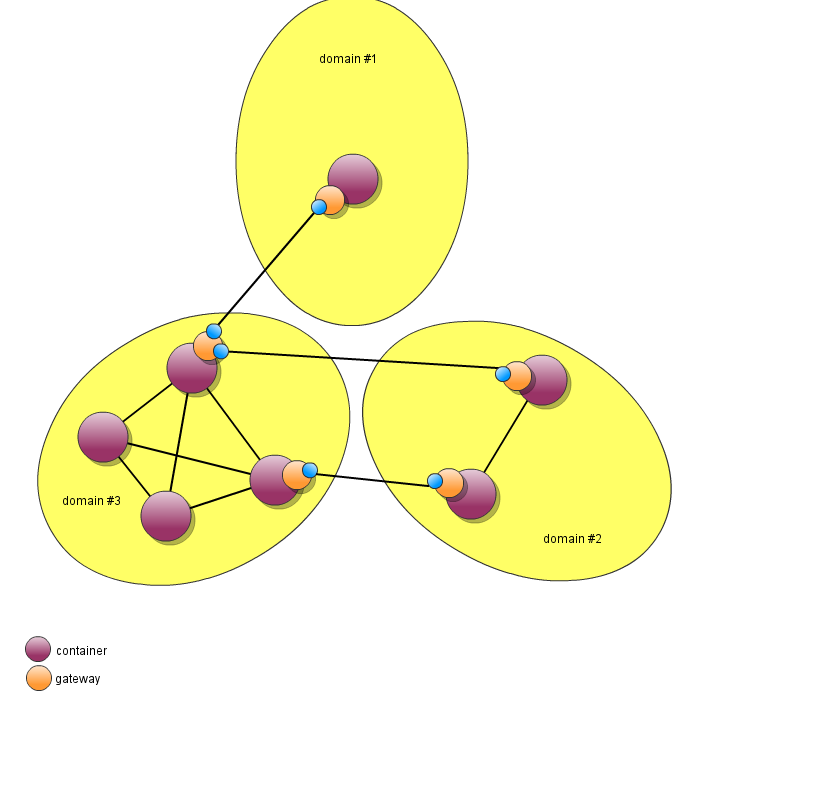
On the Petals ESB TopologyPetals ESB is a fully distributed ESB that features many types of topology both dynamically or statically. The topology of a Petals ESB cluster can be configured through a topology definition (i.e., topology.xml) and server properties (i.e., server.properties). This document will explain to you how to properly configure the topology of your Petals ESB cluster. |
Table of contents Contributors
No contributors found for: authors on selected page(s)
|
Topology composition
A Petals ESB cluster is domain that contains containers. A domain aims to limit the visibility of service endpoints.
Inside a domain:
- all service providers can be seen by all service consumers without restrictions,
- all service providers must be accessible directly to all service consumers.
Using a gateway, it is possible to interact between domains pairs:
- by default, service endpoints of a domain are not propagated to other domains,
- the gateway is configured to propagate a selection of service endpoints in both ways,
- a message sent from a service consumer located into the domain #1 to a service provider located in domain #2 will pass through the gateway.
| See the documentation of the Petals BC Gateway |
|
Configuring the domain
The domain configuration is composed of several part:
- the domain identification,
- the domain mode,
- the domain registry configuration.
Configuring the domain mode
A Petals domain supports two different modes :
- static: no new container can be added to a running Petals domain. All containers of the domain must be stopped and restarted to take into account changes.
- dynamic: a container can be attached to or detached from a running domain without requiring a full start/stop of the domain.
Choosing the domain mode
The domain mode 'static' is recommended in following use-cases:
- you want to forbid to add or remove container from your sub-domain,
- you don't plan to do hot topology refactoring
If you have a worst constraint about the availability of the Petals ESB (24/24, 7/7), you should use the mode 'dynamic' to be able to apply topology changes without stopping the Petals ESB.
Using the static mode
To use the static mode, in the domain element of the topology definition, you just have to change the mode property to static :
<tns:domain name="your-domain-name" mode="static">
See : static-topology-sample.xml
Using the dynamic mode
To use the dynamic mode, in the domain element of the topology definition, you just have to change the mode property to dynamic :
<tns:domain name="your-domain-name" mode="dynamic">
See : dynamic-topology-sample.xml
Configuring the domain registry
Configuring the implementation to use
The implementation of the domain registry can be defined through the tag 'registry-implementation' that contains the class name of the implementation to use:
<tns:domain name="domain-0" mode="static" xmlns:tns="http://petals.ow2.org/topology">
   ...
   <tns:registry-implementation>org.ow2.petals.microkernel.registry.overlay.RegistryOverlayImpl</tns:registry-implementation>
   ...
</tns:domain>
The tag 'registry-implementation' can be omitted and in that case the default implementation is the Petals Registry Overlay.
Configuring the implementation itself
The implementation itself must be configured using an extension of the domain tag. See the documentation of the registry implementation for more information.
Example:
<tns:domain name="domain-0" mode="static" xmlns:tns="http://petals.ow2.org/topology">
   ...
   <tns:registry-implementation>org.ow2.petals.microkernel.registry.overlay.RegistryOverlayImpl</tns:registry-implementation>
   ...
   <registry:configuration xmlns:registry="http://petals.ow2.org/petals-registry-overlay-client/configuration">
      <registry:group-name>default-sample</registry:group-name>
      <registry:group-password>s3cr3t</registry:group-password>
      <registry:overlay-members>
         <registry:overlay-member port="7901">localhost</registry:overlay-member>
      </registry:overlay-members>
   </registry:configuration>
</tns:domain>
Declaring containers configurations
As we have seen, the topology.xml resource is used to declare the configuration of a Petals ESB cluster.
Generic container configuration
Each Petals ESB container declared within must conforms to the following XML structure:
<tns:container name="0">
    <tns:description>description of the container 0</tns:description>
    <tns:host>localhost</tns:host>
    <tns:user>petals</tns:user>
    <tns:password>petals</tns:password>
    <tns:jmx-service>
        <tns:rmi-port>7700</tns:rmi-port>
    </tns:jmx-service>
    <tns:transport-service>
        <tns:tcp-port>7800</tns:tcp-port>
    </tns:transport-service>
</tns:container>
The meaning of these properties is summarized in the following table :
| Property name | Default value | Required | Description |
|---|---|---|---|
| name | 0 | yes | name of the container |
| description | description of the container 0 | no | description of the container |
| host | localhost | yes | host name or ip address of the container |
| user | petals | no | jmx username |
| password | petals | no | jmx password |
| jmx-service | |||
| rmi-port | 7700 | yes | jmx service port |
| transport-service | |||
| tcp-port | 7800 | yes | NIO transporter port |
Configuring the local container
As we have seen, the topology.xml file contains the declaration of many Petals ESB containers: to determine which configuration must be used by the local container at startup, you must specify one of the container name to the property petals.container.name declared in the server.properties.
#This property specifies the name of the container. In distributed mode, this property is mandatory
#and must match a container name in the topology.xml file
petals.container.name=0
The container name given to the petals.container.name property must be declared within the topology.xml file, otherwise, Petals ESB won't be able to start. This mean that you must have declared the local container configuration within the topology.xml file.
Appendix
Topology XML Schema
For more information on the structure of the topology.xml file, you can consult its XML schema definition here : petalsTopology.xsd.
