On the Petals ESB Topology
This document will explain to you how to properly configure the topology of your Petals ESB cluster. Configuring the domain modePetals ESB supports three differents domain modes :
This chapter will explain you how to choose and configure the domain mode according your needs. Choosing the domain modeStandalone mode As explained earlier, when you just have one single Petals ESB node, and you do not need any other node, you might want to use the standalone mode.
Most of the time, you know how many nodes you have in your cluster, and this number does not change over time. This mode is the most suitable for most production environments.
In some very specific usecases, the number of nodes in your Petals ESB cluster may vary while the whole cluster is running.
Using the static modeConfiguring the topology.xml file To use the static mode, in the domain element of the topology.xml file, you just have to change the mode property to static : <tns:domain mode="static" name="PEtALS">
See : static-topology-sample.xml Using the dynamic modeConfiguring the topology.xml file To use the dynamic mode, in the domain element of the topology.xml file, you just have to change the mode property to dynamic : <tns:domain mode="dynamic" name="PEtALS">
See : dynamic-topology-sample.xml
In dynamic mode, as we've explained earlier, the topology is been updated automatically. The first topology update took place 30 seconds after the node has finished its startup procedure. Then, the topology is been updated regularly at a period configured by the topology.update.period property of the $PETALS_HOME/conf/server.properties file. #Topology update period (in seconds) topology.update.period=101 Configuring the subdomain modeApart from configuring Petals ESB domain mode, you can also, for each subdomain, choose various modes :
The domain mode doesn't impact the way Petals ESB nodes communicate business data with each other. This only change the way endpoints-related informations are exchanged between nodes. This chapter will explain you how to choose and configure the subdomain mode according your needs. Standalone configurationIn standalone mode, the Petals ESB cluster is limited to one node. You can only have one subdomain, also in standalone mode, with only one node, again declared as working in standalone mode. 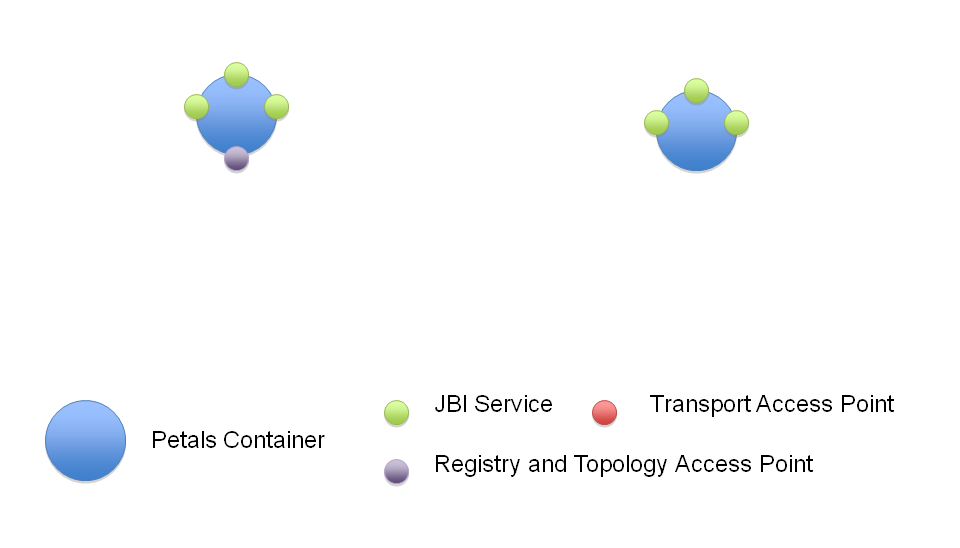
Flooding configurationIn flooding mode, each time a new service unit (registering endpoints) is installed, the node on which it has been installed propagates immediately the modification to all its peers. Business data of course is still exchanged directly between nodes, from the source directly to the destination.
A subdomain configured to use the flooding strategy can only contain node working in peer mode. The minimum number of peer node is one, while there is not limit on the number of peer nodes.
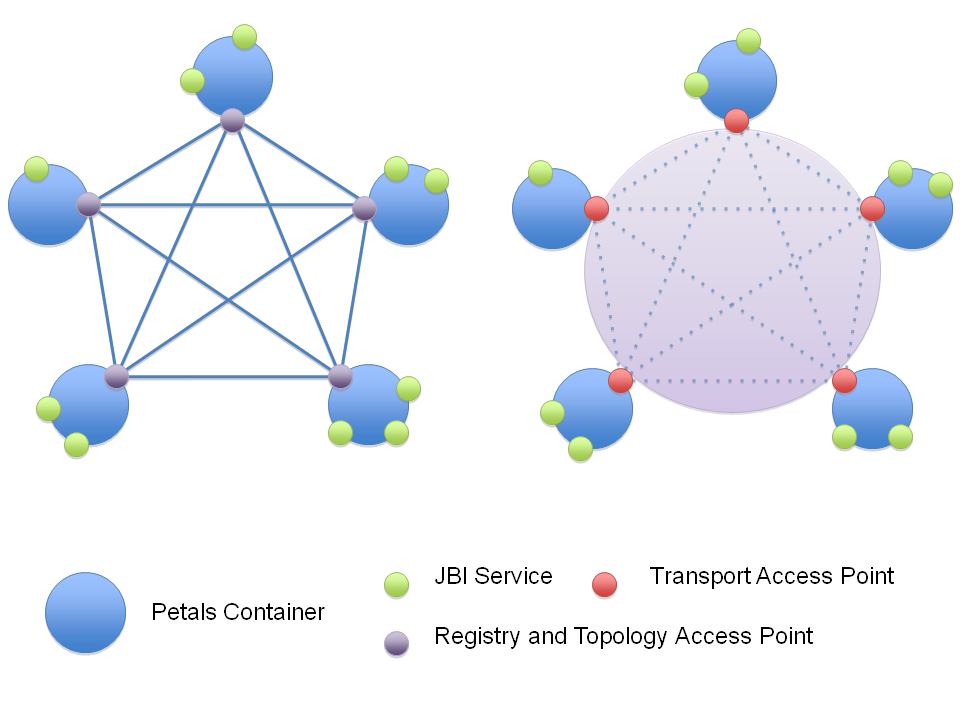
Master/Slave configurationIn master-slave mode, every node of the cluster resynchronises itself regularly against the configuration of the master node. For now on, each node knows every all the endpoints and services deployed on the cluster. In the future, this strategy will be the only one to be maintained and will be refined to control the propagation of the informations on the cluster. As ever, business data is still exchanged directly between nodes, from the source directly to the destination. 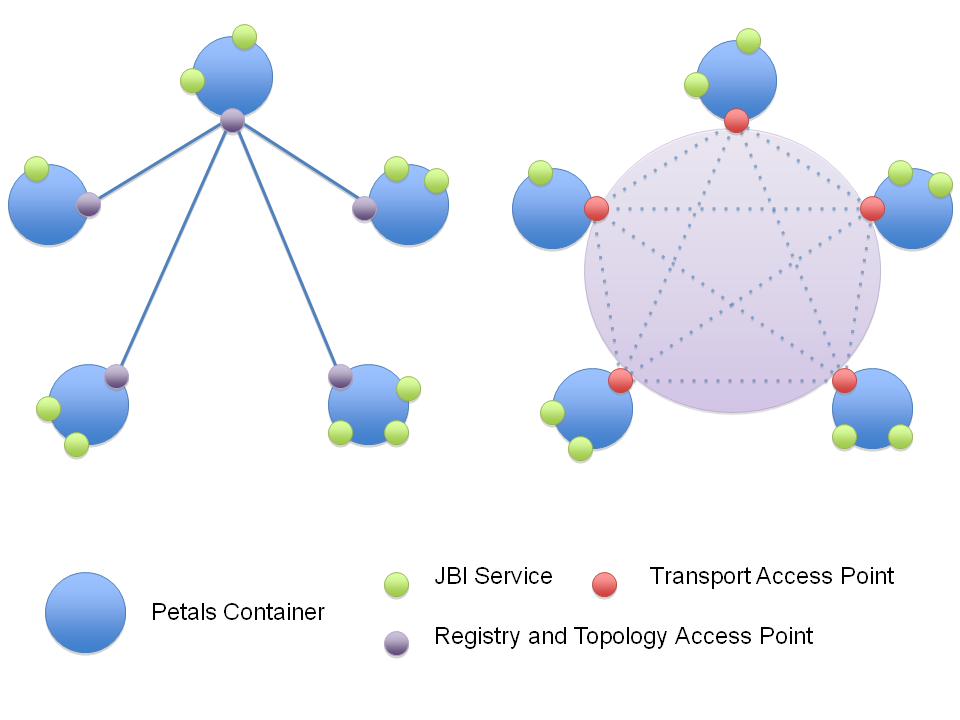 A subdomain using the master/slave strategy can only contains nodes using master or slave nodes. Each subdomain using this mode must have at least one master node. The number of slave nodes is unbounded.
Declaring containers configurationsAs we have seen, the topology.xml file is used to declare the configuration of a Petals ESB cluster. Generic container configurationEach Petals ESB container declared within must conforms to the following XML structure : <tns:container name="0" type="master"> <tns:description>description of the container 0</tns:description> <tns:host>localhost</tns:host> <tns:user>petals</tns:user> <tns:password>petals</tns:password> <tns:webservice-service> <tns:port>7600</tns:port> <tns:prefix>petals/ws</tns:prefix> </tns:webservice-service> <tns:jmx-service> <tns:rmi-port>7700</tns:rmi-port> </tns:jmx-service> <tns:transport-service> <tns:tcp-port>7800</tns:tcp-port> </tns:transport-service> <tns:registry-service> <tns:port>7900</tns:port> </tns:registry-service> </tns:container> The meaning of these properties is summarized in the following table :
Standalone container configurationA container is declared to be working in standalone mode using the following XML code : <tns:container name="0" type="standalone"> ... </tns:container>
Peer container configurationA container is declared to be working in peer mode using the following XML code : <tns:container name="0" type="peer"> ... </tns:container> This kind of containers can only be found in subdomains using the flooding strategy. Master container configurationA container is declared to be working in master mode using the following XML code : <tns:container name="0" type="master"> ... </tns:container> A domain using the master-slave strategy must have at least one and only one master node. Slave container configurationA container is declared to be working in mode mode using the following XML code : <tns:container name="0" type="slave"> ... </tns:container> A domain using the master-slave strategy can have an unbounded number of slave nodes. When using the dynamic domain mode, for a slave node, you can declare only the master configuration and the slave configuration. The first topology update will rewrite the topology.xml file and update the containers list using the ones registered to the master node.
Configuring the local containerAs we have seen, the topology.xml file contains the declaration of a Petals ESB cluster. This information is not sufficient to determine which configuration must be chosen by the local container at startup. To do so, you must give a container name declared within the topology.xml file to the property petals.container.name declared in the server.properties. #This property specifies the name of the container. In distributed mode, this property is mandatory #and must match a container name in the topology.xml file petals.container.name=0 The container name given to the petals.container.name property must be declared within the topology.xml file, otherwise, Petals ESB won't be able to start. This mean that you must have declared the local container configuration within the topology.xml file. SummaryThe table below summarize the valid configuration for the topology.xml file :
AppendixDefault configurationThe default topology.xml file is : <?xml version="1.0" encoding="UTF-8"?> <tns:topology xmlns:tns="http://petals.ow2.org/topology" xmlns:xsi="http://www.w3.org/2001/XMLSchema-instance" xsi:schemaLocation="http://petals.ow2.org/topology petalsTopology.xsd"> <tns:domain mode="static" name="PEtALS"> <tns:description>The static domain configuration</tns:description> <tns:sub-domain name="subdomain1" mode="master-slave"> <tns:description>description of the subdomain</tns:description> <tns:container name="0" type="master"> <tns:description>description of the container 0</tns:description> <tns:host>localhost</tns:host> <tns:user>petals</tns:user> <tns:password>petals</tns:password> <tns:webservice-service> <tns:port>7600</tns:port> <tns:prefix>petals/ws</tns:prefix> </tns:webservice-service> <tns:jmx-service> <tns:rmi-port>7700</tns:rmi-port> </tns:jmx-service> <tns:transport-service> <tns:tcp-port>7800</tns:tcp-port> </tns:transport-service> <tns:registry-service> <tns:port>7900</tns:port> </tns:registry-service> </tns:container> </tns:sub-domain> </tns:domain> </tns:topology> Download link : default-topology.xml Topology XML SchemaFor more information on the structure of the topology.xml file, you can consult its XML schema definition here : petalsTopology.xsd. |
Table of contents
Contributors
No contributors found for: authors on selected page(s)
|
Petals Documentation > Petals ESB > Petals ESB 4.2 > Container User Guide > Configuring Petals ESB > Topology Configuration